Solar power for homes
 Providing electricity for your home is a challenge for the independent home owner. It is also an interesting topic for sustainability and technology reasons.
The market is still very small for alternative ways of powering homes, but steadily growing as prices of solar panels and batteries go down. In the future I think every home will use its own power.
This post outlines the parts needed for a solar power system, and shows what components I plan to use for my own system at Kullfallet.
Most systems are grid-tied, which eliminates the need for batteries, and enables you to sell surplus electricity back to the grid, in effect making the meter run backwards.
My system is not grid-tied, and therefore more costly, but also makes me 100% independent.
System parts
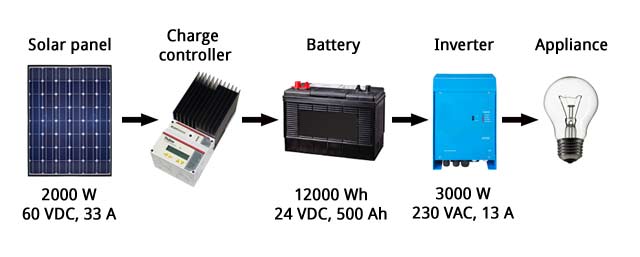
A typical system has four parts:
The solar panel converts solar radiation to electricity, to be charged into the battery. This is where the free energy comes from.
The charge controller makes sure that as much as possible of the power from the solar panel is stored in the battery. It also makes sure the battery is healthy, and it has a display where you can read the status of the system.
The battery stores the power from the solar panel to let you use it later. It acts as a much needed buffer, since electricity is produced unevenly, for example badly on overcast days and not at all at night, and electricity is also consumed unevenly, for example when you turn on and off appliances.
The power inverter transforms the voltage of the batteries (24 V DC) to a voltage that is more useful for appliances (230 V AC).
Designing the system
To design the size of the system you take the following factors into account:
- Total energy used per month, which will determine the size of the solar panels and charge controller.
- Maximum total power used at any time, which will determine the size of the power inverter.
- Cloudy day safety margin, which together with total energy use per month will determine the size of the batteries.
Solar panels
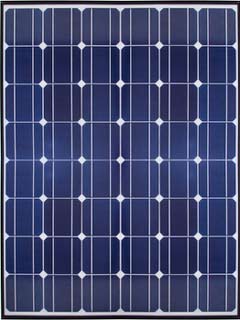
The energy of the solar rays that hit the earth (irradiation) is around 1000 W per m2. A typical solar panel rated 250 W is 1.64 x 0.99 m in size, so it has an efficiency of 15%. On a cloud free day, directly facing the sun, it will produce 250 W, but in real life scenarios a lot less.
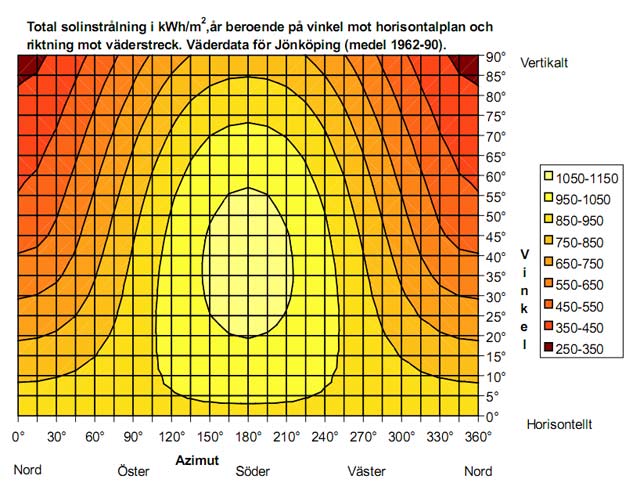
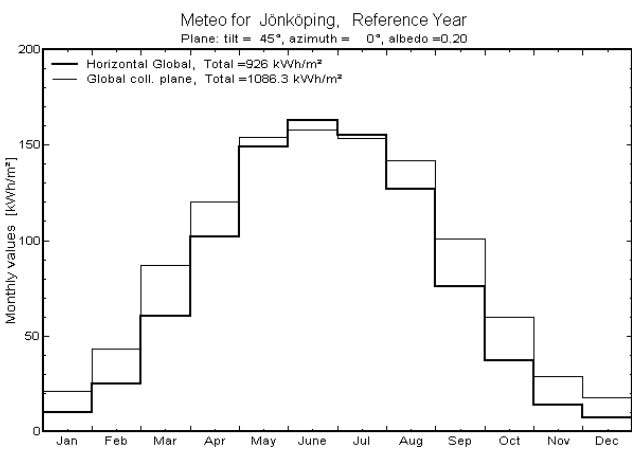
As the sun travels across the sky, the panel should optimally be continuously tilted by motors to directly face it. This produces around 30% more energy compared to a fixed mount, but adds complexity and installation cost. In Sweden, solar panels are normally mounted at a fixed 45 degree angle, facing straight south. The below diagram shows the total sun irradiation in kWh/m2 for a fixed mount panel at different angles.
Equivalent sun hours is a figure that is measured for different locations, to give an idea how much solar energy can be harvested each month of the year. For example, 150 hours for the month of May means that the panels will be exposed to the equivalent of 150 hours of cloud free sun shine during that month.
The easiest way to get an idea of total power consumption is to simply look at the utility bill for electricity. When I had my farm i Thailand, it was usually around 150 kWh/month. But then I was never thrifty with my use, and constantly had two fridges running, which are big consumers. A more modest estimate for my new installation would be 75 kWh/month. This gives an average consumption of 100 W (running a 100 W appliance around the clock).
Or you can look at the power ratings of the various appliances you will connect, and calculate a total for the month.
The system also has conversion losses in cables (5%), charge controller (5%), batteries (20%) and power inverter (10%), so that only about 60% of the energy generated by the solar panels end up being consumed by the appliances.
In my case I will not live in the house in the winter, so I use the above figure for March, which has 60 kWh of sun irradiation per m2. A typical 250 W panel with a size of 1.6 m2 and an efficiency of 15%, will produce 14.4 kWh of energy during the month of March. Using eight panels will give me 115 kWh, and subtracting the system losses it becomes 70 kWh available for appliances. This is close enough to my target of 75 kWh. This is for the worst month of the year, with June giving almost three times the energy.
Charge controller
The charge controller transforms the solar panel voltage to the voltage required by the battery, and adjusts this as the battery goes through the various stages of charging. The controller is the brain of the system, and where you can monitor the system performance on a display or through a computer interface.
The voltage from a solar panel varies depending on irradiation and temperature, and is typically a lot higher than the battery voltage, so that charging can take place. A standard 24 V solar panel will typically have an output voltage of 30 V. In theory you can connect the panel directly to the battery, but the charging will not be optimized for the battery and its life span will be reduced dramatically.
Charge controllers are of two types: the cheaper PWM (pulse width modulated) controllers and the more advanced MPPT (maximum power-point tracker).
In a PWM controller the over-voltage from the panels is unused and effectively lost, while the MPPT is a real DC-DC converter that uses all available energy from the solar panels. For a smaller system up to 1000 W a PWM controller is sufficient, but anything larger than that will benefit from a MPPT controller.
The MPPT controller also adjusts the current drawn from the solar panel, so it operates at the highest power point, which is the point where the voltage and current produces the highest power (P = I * U). The combination of adjusting the input current and having a true DC-DC converter results in around 30% more power to the batteries compared to a PWM controller.
Another advantage of a MPPT controller is that it allows any solar panel voltage to be used with any battery voltage. This makes wiring cheaper because you can set the panels in a high voltage configuration. For example you can use 48 V panels to charge a 24 V battery, using half the wire sizes compared to using 24 V panels.
MPPT controllers come in sizes depending on maximum charge current and maximum panel voltage, for example 60 A and 150 V. Using this controller with a 24 V battery, sets the solar panel limit to 24 V * 60 A = 1,440 W.
Connecting more panels, for example 2000 W, will not break the controller, but the added power will simply not be charged to the batteries; the maximum charge current sets the limitation. Keep in mind that a panel will only produce its full power when the sun is shining at a perfectly straight angle without any clouds. Most of the time the panel will produce a lot less than this.
When stringing together panels in a high voltage configuration, the open circuit voltage of the solar panels can be much higher than anticipated. This also increases in low temperatures. A 24 V panel can have a Voc of 38 V. Stringing four such panels together can potentially break a controller rated for 150 V.
Although a MPPT controller works with any input voltage, it has its highest efficiency in a low voltage solar panel configuration.
Battery
Of all the parts of a solar power system, the battery is the only one that will need periodic replacement, because it degrades over time. So it pays to make an informed choice when purchasing new batteries.
The most cost effective battery type for solar power is still the lead acid variety. However not all lead acid batteries are the same.
A typical car battery is made to deliver a high current to the engine crank, and to not be deeply discharged. It has thin lead plates with a large surface area to be able to deliver the current. This is not suitable for solar power.
The deep-cycle battery is the choice for solar power. It has thick lead plates which allow for many cycles of deep discharge, but it can only deliver moderate current, which is not a problem for solar applications.
The maximum number of discharge cycles is a figure that states the life span of a battery. It is typically measured at 50% DOD (depth of discharge), which means that the battery is discharged to half of its capacity, then charged up again, and the cycle is repeated until the battery has degraded enough to be discarded. A typical deep-cycle battery can sustain 500 cycles at 50% DOD.
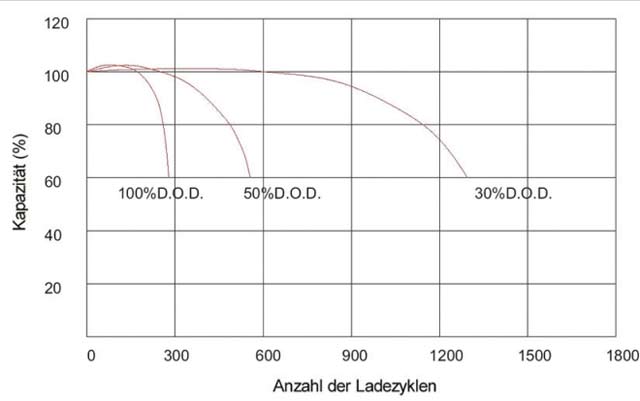
Above: a diagram showing how a battery degrades over time. This battery will have 70% of its original capacity after 500 cycles at 50% DOD. In other words, if this originally was a 100 Ah battery, it would be a 70 Ah battery after 500 cycles at 50% DOD.
The relation between DOD and max number of cycles is not linear. The lower the DOD, the exponentially higher number of cycles the battery can sustain. In the above diagram, the battery can sustain 500 cycles at 50% DOD and 70% capacity, but 1500 cycles at 25% DOD and 70% capacity.
This means that if one battery lasts one year, then two batteries will last not two years but three years. The lesson learned is to buy as many batteries as you can afford, to make the DOD as low as possible each day, so that the batteries will have a long life span. However don't expect more than 10 years of life from any battery.
Most battery suppliers will not offer nice charts like the one above. To get around this, you can look at the weight of the battery. The more lead, the heavier it will be, and the better it will probably be for deep-cycling. It should range from around 0.27 kg/Ah for a standard 12 V deep-cycle battery, to 0.33 kg/Ah for a professional one.
Number of cloudy days also affects the size of the battery bank, because you need a margin for days when the solar panels don't charge very much.
As rule of thumb, aim for a 20% DOD per day for the battery. Worst case, with no charging at all, the battery bank will last for 5 days. But in real life, when you have an over-sized solar panel, it will charge the batteries even with dark overcast skies. So you run no real risk of depleting the battery. Worst case, you should have a gasoline fueled generator at hand.
For my own system, I use 75 kWh of electricity per month, or 2.5 kWh per day. With 20% DOD per day, I would need a 12 kWh battery bank, equivalent of ten 12 V 100 Ah batteries.
Power inverter
The power inverter transforms the battery voltage of 24 VDC into a more useful 230 VAC that can run appliances. Add up the power ratings of all the equipment that could possibly be on at the same time, and you have the power rating for the inverter. Some equipment consume a lot of power in short bursts, such as a toaster (1000 W), microwave (850 W), water pump (1500 W) or power tools (500 - 1500 W).
However power inverters are expensive, so it helps to be mindful about turning on and off equipment, so you can do with a moderate size inverter. 1500 W can do for small cabins, 3000 W is a typical choice for home owners, and 6000 W can power almost anything you throw at it. But a larger inverter also has a higher idle drain on the batteries. It is not unusual with an idle drain of 40W. This might not sound like much, but over time it will deplete your batteries.
Not all power inverters are the same though. The cheaper modified sine wave variety gives an output that is distorted, and can only be used with non sensitive equipment such as motors, fans, heaters, etc. The better choice is a perfect sine wave inverter, which can power anything, including sensitive stuff like a computer, hi-fi amplifier and TV. It pays to get an inverter from a reliable brand. The inverter is usually the part that breaks first from slight abuse and inadvertent power overloads.
Certain equipment have a very high power surge when you turn them on, such as a vacuum cleaner and water pump. Make sure the inverter can handle them. An inverter can typically handle twice its power rating for a very short surge.
A well designed power inverter has a low battery voltage turn-off function, to not completely drain the battery, which could wear it out prematurely.
System configuration
The solar panels and batteries need to be connected in a certain optimum configuration, to make the cost of wiring the lowest, and system performance the best. The aim is to lower the current in the wires as much as possible, while at the same time finding equipment that can handle the resulting high voltage levels.
A power inverter only works with a certain input voltage, so it will set the voltage configuration of the battery bank. Aim for as high voltage as possible. A 12 V inverter will only do for a small system. A 24 V or 48 V inverter is a better choice if you can find it. Then you can use thinner cables, and the efficiency of the inverter and charge controller will also be better.
The solar panel configuration is determined by the distance to the panels, and the maximum input voltage of the MPPT charge controller. If the distance between the panels and controller is large, then string as many as possible together without exceeding the voltage limit, to be able to use thin wires. If the distance is small, then string a few together to match the battery voltage, to make the efficiency in the regulator better.
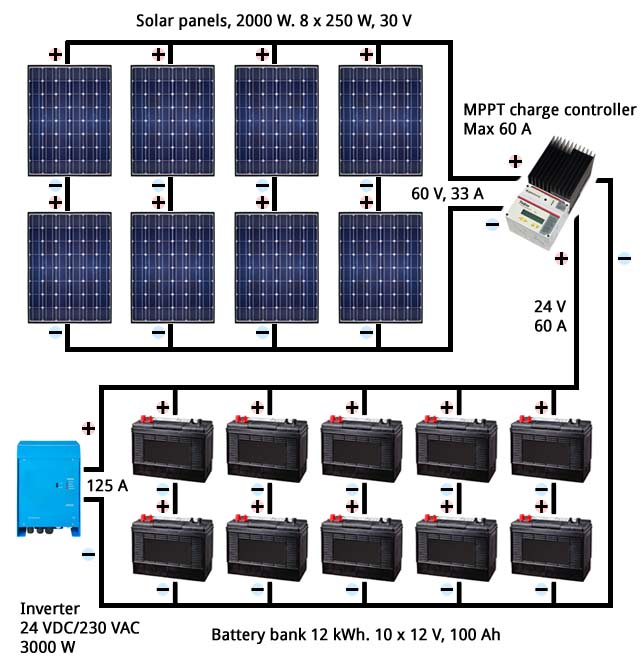
Below: the configuration for my solar power system.
Cables
What wire gauge to use is determined by how high voltage drop the equipment can tolerate, what power loss that is acceptable, and the maximum power dissipation in the cable before it becomes a fire hazard. The latter is regulated by building code. Copper has a conductivity of 18 milliohm per mm2 for each meter. The below list shows the AWG number, cross section area, maximum fuse size, and conductivity of a few wire gauges:
AWG 18, 0.75 mm2, 7.5 A, 24 mohm/m
AWG 17, 1 mm2, 10 A, 18 mohm/m
AWG 15, 1.5 mm2, 15 A, 12 mohm/m
AWG 13, 2.5 mm2, 25 A, 7.2 mohm/m
AWG 11, 4 mm2, 30 A, 4.5 mohm/m
AWG 9, 6 mm2, 40 A, 3 mohm/m
AWG 7, 10 mm2, 60 A, 1.8 mohm/m
AWG 5, 16 mm2, 80 A, 1.12 mohm/m
AWG 3, 25 mm2, 125 A, 0.72 mohm/m
AWG 2, 30 mm2, 150 A, 0.60 mohm/m
AWG 0, 50 mm2, 200 A, 0.36 mohm/m
The batteries, inverter and charge controller are mounted as close as possible together, in a dry and well ventilated place.
Between the batteries, and from the battery bank to the inverter, there will be at most a current of 125 A (3000 W at 24 V), so a 30 mm2 cable is sufficient. A 3 m 30 mm2 cable running 125 A will create a voltage drop of 0.225 V, and dissipate 28 W, which is a negligible power loss of 1%.
I originally installed my solar panels on the ground, 25 m from the house. This required a 50 m cable since it runs both ways. This cable carries a current of at most 33 A, but 90% of the time the current is 20 A or less. Voltage drops are unimportant, because the MPPT controller accepts any input.
From a safety standpoint a 6 mm2 cable will do, since it can carry 40 A. At 33 A it will dissipate 165 W, which is a power loss of 8%. But most of the time it carries 20 A, at a power loss of 5%.
Upgrading to a 10 mm2 cable will instead dissipate 99 W at 33 A, which is 5%. At 20 A it dissipates only 3% of the power from the panels. I opted for this cable for my installation. Later when I moved the solar panels to the roof of the house, I kept the same cable, but only a third of its length was used.
Part list
Parts for my solar power installation:
- 8 x Swemodule, 250 W solar panels, manufactured in Glava outside Arvika, Sweden. These are discount modules, rejected from production because of minor aesthetic problems.
- A second hand Morningstar TS-MPPT-60 charge controller.
- Biltema flooded lead acid deep-cycle batteries, 10 x 12 V, 100 Ah, number 80100.
- A Sun Gold PSW7-30-24-E00 power inverter, which can deliver 3,000 W continuously and 9,000 W for a few seconds (in theory).
- Cables, fuses, distribution board, etc, mostly bought at Biltema.
Technical details
To prevent shock and current leaks, the frames of the solar panels should be connected together and grounded. Install a lighting rod near the panels to save them during thunder storms.
Unless the charge controller and power inverter have built-in overload functions, fuses should be installed between the panels and controller, and between the batteries and the inverter.
All systems have an idle power consumption, which in the end drains the batteries, even though you might not have any appliances turned on. If you leave the system unattended for long periods of time, fully charge the batteries and then disconnect them. Fully charged batteries can last for half a year without any maintenance charging in cold weather, like the Swedish winter.
Economy
Unfortunately, an independent solar power system does not come at any significant savings. The cost of replacing batteries every 10 years eats up the savings made in the long run.
Ten 12 V 100 Ah batteries cost around 14,000 SEK. Ten years of grid electricity (9,000 kWh) would have been the same cost.
The above assumes that the upfront cost of grid installation is around the same as the solar power installation, around 25,000 SEK.
So it is not for economical reasons I do this, but for the feeling of independence, and because it is something interesting to try out, and learn more about.
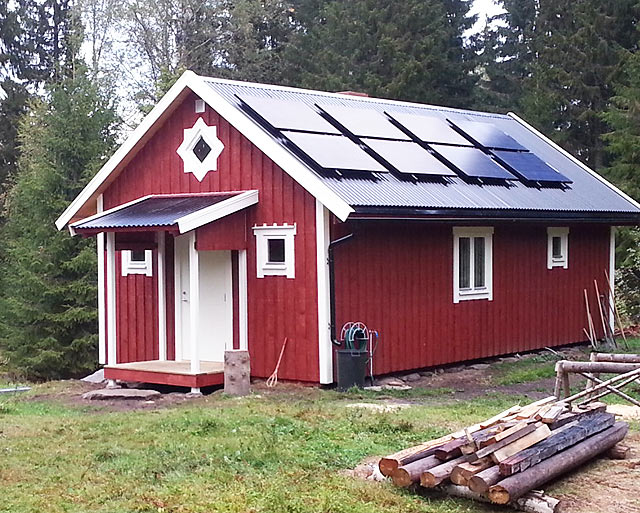
Below: the eight panels mounted on my roof.